Configuring your iPhone with e-mail: Difference between revisions
(Created page with "This page assumes you have already created an e-mail address and have not yet configured your iPhone with any e-mail addresses (if you current...") |
No edit summary |
||
| (2 intermediate revisions by the same user not shown) | |||
| Line 28: | Line 28: | ||
The Incoming mail server username will be your full e-mail address. When this information has been entered, tap "Save" again to complete configuration! Your phone may take a moment to verify this information and make an initial connection to the mail servers. If this is a brand new e-mail address, please allow some extra time for the connection to be made. | The Incoming mail server username will be your full e-mail address. When this information has been entered, tap "Save" again to complete configuration! Your phone may take a moment to verify this information and make an initial connection to the mail servers. If this is a brand new e-mail address, please allow some extra time for the connection to be made. | ||
'''Note:''' You may receive an error related to no connection being made to the outgoing and/or incoming server. If this is the case, tap the 'details' button on the error window and tap 'accept' in the top right corner. | |||
4. You can now access your inbox by tapping the "Mail" icon. | |||
Latest revision as of 12:51, 23 January 2013
This page assumes you have already created an e-mail address and have not yet configured your iPhone with any e-mail addresses (if you currently have other e-mail addresses associated with your phone, please first read the note at the bottom of this page).
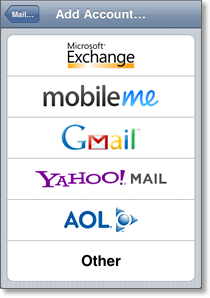
1. Tap the "Mail" icon on your phone. You will see the below screen, at which point you will want to tap "Other".
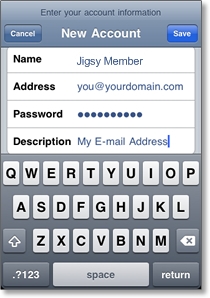
2. Tap "Add Mail Account" at the top of the next screen under the "Mail" heading, then fill in your details and tap "Save" when ready. The e-mail address and password will need to be exactly as you entered them in your Jigsy account.
If you think you made a mistake here but saved the details, don't worry - you can change them in the next step.
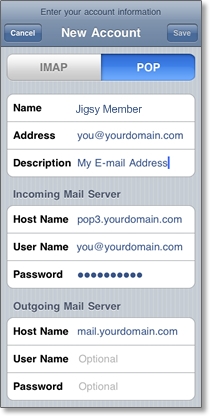
3. Because Jigsy offers POP3 e-mail addresses, make sure you tap POP at the top of the next screen. All that is required now is to fill in the incoming (POP3) and outgoing (SMTP) mail server information to complete configuration!
These server details are specific to your domain. The below screenshot shows how this information should be entered, where "yourdomain.com" is replaced with the registered domain associated with this e-mail address.
The Incoming mail server username will be your full e-mail address. When this information has been entered, tap "Save" again to complete configuration! Your phone may take a moment to verify this information and make an initial connection to the mail servers. If this is a brand new e-mail address, please allow some extra time for the connection to be made.
Note: You may receive an error related to no connection being made to the outgoing and/or incoming server. If this is the case, tap the 'details' button on the error window and tap 'accept' in the top right corner.
4. You can now access your inbox by tapping the "Mail" icon.
Completing these quick steps will allow you to take any e-mail address with a mailbox created within your Jigsy account anywhere you take your iPhone!
Note: If you have an existing e-mail address configured with your phone, simply tap "Settings" then "Mail, Contacts, Calendars" and finally "Add Account...". You can now start from Step 1 of this article.


