BlogComponent: Difference between revisions
mNo edit summary |
No edit summary |
||
| (6 intermediate revisions by 2 users not shown) | |||
| Line 4: | Line 4: | ||
Have a blog with another popular blogging site such as [http://www.blogger.com Blogger] or [http://www.wordpress.com WordPress]? Your blog posts can be imported to be used with this component so the posts are embedded on your site! To do this, visit the "Blog Posts" area of the "My Content" section of the [[Toolbar]]. | Have a blog with another popular blogging site such as [http://www.blogger.com Blogger] or [http://www.wordpress.com WordPress]? Your blog posts can be imported to be used with this component so the posts are embedded on your site! To do this, visit the "Blog Posts" area of the "My Content" section of the [[Toolbar]]. | ||
==Where to Find== | |||
This Component can be found in the [[Adding to a Page | "Add Content to Page"]] section of the [[Toolbar]]. | |||
This Component can be found in the [[Adding to a Page | "Add to Page | |||
==Adding to Website== | |||
After selecting this Component, you will be able to choose exactly where you want to add it! | After selecting this Component, you will be able to choose exactly where you want to add it! | ||
| Line 19: | Line 14: | ||
You will see all available [[content locations]] it can be added to - on the current page only (content locations in Gold), on every page (content locations in Red), or on every page under the current page directory (content locations in Blue. For example - if you are editing a page called "About", the blue content locations would allow you to add this component to all pages under the /about/ directory). | You will see all available [[content locations]] it can be added to - on the current page only (content locations in Gold), on every page (content locations in Red), or on every page under the current page directory (content locations in Blue. For example - if you are editing a page called "About", the blue content locations would allow you to add this component to all pages under the /about/ directory). | ||
==Options== | |||
| Line 37: | Line 30: | ||
You can '''enable feed auto-discovery so people can subscribe to this blog''' via an RSS feed and '''choose specific categories to display''' among those created. These will display below this check box if selected. | You can '''enable feed auto-discovery so people can subscribe to this blog''' via an RSS feed and '''choose specific categories to display''' among those created. These will display below this check box if selected. | ||
'''Choose specific categories to display''' allows you to determine which posts will display based on all or any of the categories available (as defined in the [[Blog Categories]] section of the builder). These can be created, edited, modified and deleted by you in the Blog Categories manager. | |||
Below is an example of a categorized post in the '''General''' category displaying via choosing this category to display: | |||
[[Image:Blogcat.PNG]] | |||
Separating your posts into categories allows you to display different posts on different sections of your website, or simply allow visitors to browse your posts by topics of their interest. | |||
| Line 46: | Line 51: | ||
An optional link to your archived posts can be created using the '''Display archive link for older posts''' check box. | An optional link to your archived posts can be created using the '''Display archive link for older posts''' check box. | ||
==Editing== | |||
Need to make a change? You can access the settings for this Component again by clicking on the "Settings" button on the [[Component Toolbar]]. To edit or remove the blog post content itself, click on the edit or delete icons on the left side of the component toolbar: | |||
[[Image:Blogpostbuttons.PNG]] | |||
For more information about this, see [[Editing a Blog Post]]. | For more information about this, see [[Editing a Blog Post]]. | ||
==Example Sites== | |||
An example of this Component can be viewed on the [http://builderexample.com/blog-components Blog Components] page of http://builderexample.com | |||
An example of this Component can be viewed on the [http:// | |||
[[Category:Components]] | [[Category:Components]] | ||
[[Category:Blogging Components]] | [[Category:Blogging Components]] | ||
Latest revision as of 13:35, 27 March 2014
Display blog posts you have written as a list, summary, or full posts on your website as an embedded Component!
Have a blog with another popular blogging site such as Blogger or WordPress? Your blog posts can be imported to be used with this component so the posts are embedded on your site! To do this, visit the "Blog Posts" area of the "My Content" section of the Toolbar.
Where to Find
This Component can be found in the "Add Content to Page" section of the Toolbar.
Adding to Website
After selecting this Component, you will be able to choose exactly where you want to add it!
You will see all available content locations it can be added to - on the current page only (content locations in Gold), on every page (content locations in Red), or on every page under the current page directory (content locations in Blue. For example - if you are editing a page called "About", the blue content locations would allow you to add this component to all pages under the /about/ directory).
Options
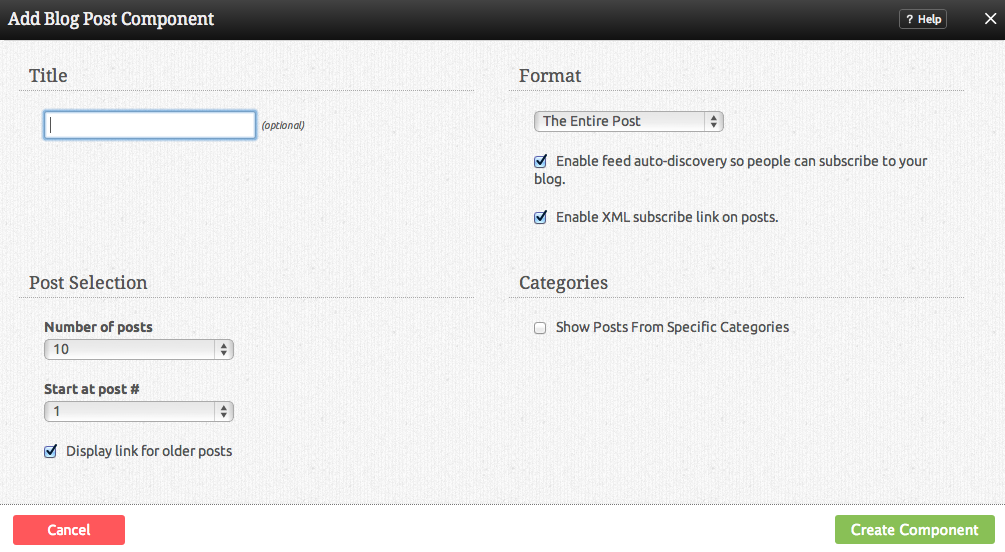
You can optionally set a Title to be displayed above the post content on your page.
You can choose from the following Display option:
- Titles Only
- Summarized Posts
- Full Posts
You can enable feed auto-discovery so people can subscribe to this blog via an RSS feed and choose specific categories to display among those created. These will display below this check box if selected.
Choose specific categories to display allows you to determine which posts will display based on all or any of the categories available (as defined in the Blog Categories section of the builder). These can be created, edited, modified and deleted by you in the Blog Categories manager.
Below is an example of a categorized post in the General category displaying via choosing this category to display:
Separating your posts into categories allows you to display different posts on different sections of your website, or simply allow visitors to browse your posts by topics of their interest.
The Number of Posts field will let you set the number of posts that display on your page at a time - between 1 to 20, 25 or 30.
The Start at Post # field will let you set an offset to start showing posts at a position other than the very first post - between 1 to 20, 25 or 30. An example could be to create a list of blog posts showing titles only in your side bar from posts 5-10, while showing the first 5 posts in full on your main page.
An optional link to your archived posts can be created using the Display archive link for older posts check box.
Editing
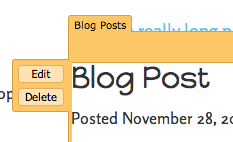
Need to make a change? You can access the settings for this Component again by clicking on the "Settings" button on the Component Toolbar. To edit or remove the blog post content itself, click on the edit or delete icons on the left side of the component toolbar:
For more information about this, see Editing a Blog Post.
Example Sites
An example of this Component can be viewed on the Blog Components page of http://builderexample.com


